How to manage rollouts and rollbacks using ArgoCD
Learn how to manage canary, blue-green deployments and rollbacks using Argo Rollouts. These methods can greatly reduce downtime during deployments.
Imagine you’re implementing a critical backend update through your typical continuous integration, continuous deployment (CI/CD) pipeline and the new version of the application unexpectedly crashes. This would disrupt the entire user base. This inconvenience underscores the critical role of strategic deployment patterns. Utilizing methods like canary or blue-green releases can greatly reduce downtime, ensuring reliable, smooth updates for uninterrupted online engagements. However, manually implementing these strategies is out of the question since, far from helping, they would add a layer of complexity regarding traffic routing and application management.
Argo Rollouts is a progressive delivery tool that uses the Kubernetes controller and custom resource definition (CRD) constructs to enhance the Kubernetes built-in deployment capabilities. This provides more control during the application deployment process and allows you to implement blue-green and canary deployments easily. Moreover, if necessary, you can use Argo Rollouts to roll back to a previous version, ensuring minimal downtime and improving the reliability of your application deployments.
This tutorial explains canary and blue-green deployments, compares their differences, and shows how to implement both strategies using Argo Rollouts.
Before Getting Started
While you can read this article without completing the tutorial steps, following along will give you firsthand experience of the capabilities of Argo Rollouts. Before starting, you need the following:
- A functional Kubernetes cluster, whether local or remote. The tutorial uses minikube for its simplicity.
- The kubectl command line tool installed and properly configured to access the Kubernetes cluster.
- The Kustomize configuration management tool installed on your local machine.
- The Argo Rollouts Kubernetes controller and kubectl plugin installed on your cluster and local machine, respectively.
Install the controller using these commands:
kubectl create namespace argo-rollouts
kubectl apply -n argo-rollouts -f https://github.com/argoproj/argo-rollouts/releases/latest/download/install.yaml
Install the plugin on macOS with this command:
curl -LO https://github.com/argoproj/argo-rollouts/releases/latest/download/kubectl-argo-rollouts-darwin-amd64Make sure that you replace darwin with linux if you have a Linux machine.
Lastly, clone the tutorial repository to an appropriate location:
git clone https://github.com/argoproj/rollouts-demo.gitWith these requirements out of the way, it’s time to explore canary and blue-green deployment strategies.
Canary Releases and Blue-Green Deployments Explained
Canary and blue-green deployments are two strategies used in Argo Rollouts to manage the progressive delivery of applications. While both methods aim to minimize downtime and enhance user experience, their approach differs.
Canary deployments start by releasing new versions to a few users. If things go well, everyone else gets the update. This approach lets you test new features safely and pull back if needed without impacting all users.
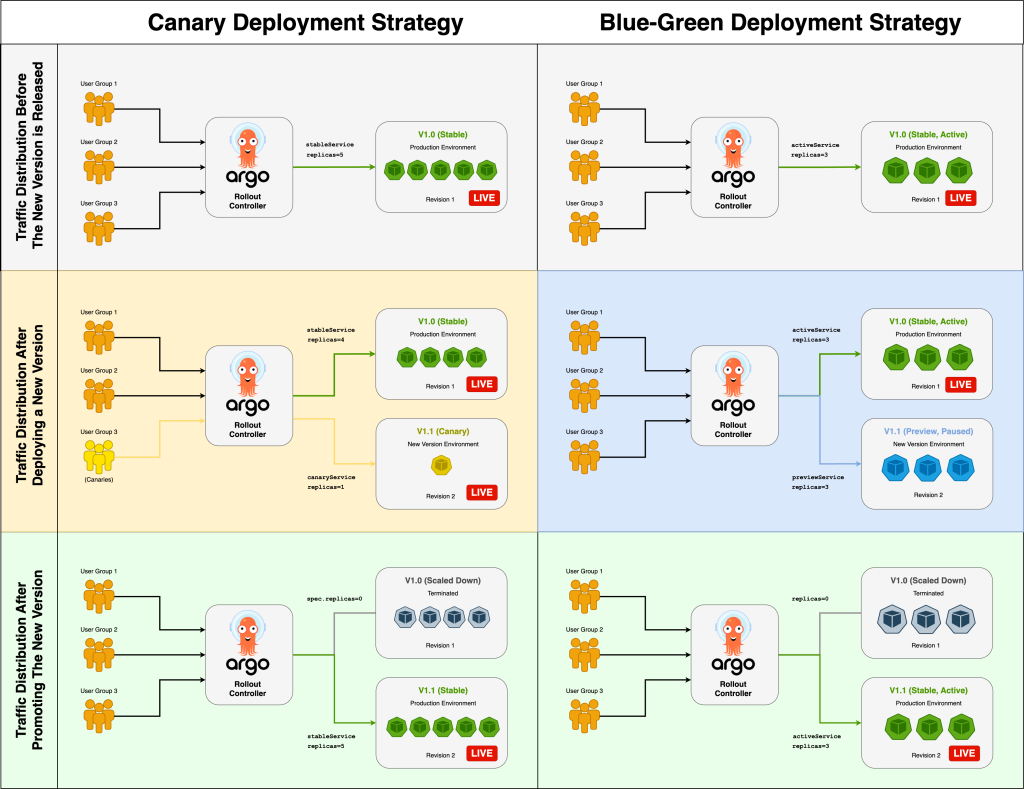
During canary deployments with Argo Rollouts, two key aspects are managed: splitting traffic between the current (stable) and new (canary) versions and keeping a mix of replicas of both versions active. There are three main phases in a standard canary deployment process:
- Argo initially directs all user traffic to the current production version with all replicas running it. For instance, if you have five replicas, all five are serving the stable version.
- Argo starts the canary deployment based on your setup when you introduce a new version. If you choose to route 20 percent of traffic to the new version, then one out of five replicas will run this new version, and the
canaryServicewill manage user traffic to it. You can pause the rollout at this stage to evaluate the new version’s performance. - Argo gradually replaces old replicas with the new version in set increments, say from 20 percent to 100 percent, if the new version performs well and you opt to proceed. During this process, Argo ensures the total number of replicas remains constant, like keeping five replicas active.
Blue-green deployments use two identical environments: one hosts the stable version (blue) and the other the new version (green). This method is perfect for updates with no downtime as the new version matches the live environment, letting you switch all users to it at once.
Meanwhile, blue-green deployments with Argo Rollouts involves the following process:
- Argo directs all traffic to the stable version with
activeService. If you have three replicas, all three serve the production version. - Argo, upon updating the app, sets up a new (preview) environment with
previewService, deploying three replicas of the new version. You typically pause here to check if the new version aligns well with production. - You promote the rollout after verifying everything works as expected, which then leads Argo to switch
activeServiceto the new version and ends the use of the old version’s replicas.
The following diagram shows you an overview of both strategies and how they carry out the update process:
After this high-level overview of how Argo Rollouts performs updates, it’s time to move on to how you can implement each strategy.
Implementing Canary Deployments with Argo Rollouts
For simplicity, you’ll use the same example for this canary deployment; that is, an application with five replicas is updated in 20 percent increments with intermediate pauses for performance monitoring. During the initial stage, Argo routes 20 percent of users to the new version, which means that one out of five replicas will run the new version, while the remaining four replicas will continue with the stable version. At that point, the process stops, waiting for you to confirm that it’s time to start promoting the rest of the users to the new version.
Setting Up a Canary Release
To set up a canary deployment, you create Ingress controllers to control the routing traffic and corresponding services. You will find these files in rollouts-demo/examples/base/canary. Additionally, you must create a file where you set up Argo Rollouts; this example uses the name canary-rollout.yaml.
You can find the file in rollouts-demo/examples/canary/canary-rollout.yaml. canary-rollout.yaml uses the Rollout resource to set up the canary deployment:
apiVersion: argoproj.io/v1alpha1
kind: Rollout
metadata:
  name: canary-demo
spec:
  replicas: 5
  revisionHistoryLimit: 1
  selector:
    matchLabels:
      app: canary-demo
  template:
    metadata:
      labels:
        app: canary-demo
    spec:
      containers:
      - name: canary-demo
        image: argoproj/rollouts-demo:blue
        imagePullPolicy: Always
        ports:
        - name: http
          containerPort: 8080
          protocol: TCP
        resources:
          requests:
            memory: 32Mi
            cpu: 5m
  strategy:
    canary:
      canaryService: canary-demo-preview
      steps:
      - setWeight: 20
      - pause: {}
      - setWeight: 40
      - pause: {duration: 10}
      - setWeight: 60
      - pause: {duration: 10}
      - setWeight: 80
      - pause: {duration: 10}
Let’s break down the code:
kind: Rolloutidentifies the resource as a Rollout.name: canary-demonames the Rolloutcanary-demo.revisionHistoryLimit: 1restricts the stored revisions for the Rollout to one.image: argoproj/rollouts-demo:bluesets the initial image for thecanary-demoasargoproj/rollouts-demo:blue.strategyspecifies the deployment strategy to use, such ascanaryorblue-green, determining how updates are introduced to your environment.canarydefines this rollout as a canary deployment, allowing incremental updates with a subset of users before full rollout.stepsoutlines a sequence of actions (steps) to be executed during the rollout process. In this example, eight steps were defined, but you can adjust the number of steps to your requirements.setWeightadjusts the percentage of traffic directed to the new version (canary) during an update, facilitating gradual exposure to users. In this example, the initial step redirects 20 percent of the traffic to the new version and then halts. After promotion, the process resumes in 20 percent increments until the update is completed.pause: {duration: TIME}temporarily halts the rollout process for a specified duration, providing a window to validate stability before proceeding. Not specifying the duration means pausing indefinitely until manually resumed (promotion). In this example, the first pause is indefinite, while the duration of the rest is ten seconds each. You could set each pause to indefinite or any combination that works for you.
This simple rollout works to explain the canary strategy in a tutorial; for a comprehensive list of all the fields available in the Rollout specification, you can check the docs.
Rolling Out a New Version Using a Canary Release
To implement the rollout, begin by navigating to the root directory of the demo repository:
cd /rollouts-demo/Create a new namespace for the rollout, which is named canary in this example:
kubectl create ns canaryRun kustomize to deploy the rollout in your Kubernetes cluster:
kustomize build examples/canary | kubectl -n canary apply -f -To verify that everything is working as expected, run the following command to list all rollouts in the canary namespace:
kubectl argo rollouts list rollouts -n canaryThe output should be similar to the following:
NAME         STRATEGY   STATUS        STEP  SET-WEIGHT  READY  DESIRED  UP-TO-DATE  AVAILABLE
canary-demo  Canary     Healthy       8/8   100         5/5    5        5           5
Now, you know the rollout is active, but you lack visibility into the ongoing processes. With Argo, you can monitor the progressive deployment using either the CLI or your browser. For a comprehensive view, the rest of the tutorial features split-screen screenshots, displaying the CLI output on the left and the Argo Rollouts Dashboard on the right.
If you want to achieve a similar result, you need to have at least two terminal windows open simultaneously, both at the rollouts-demo root directory.
In the first one, run the command that executes Argo’s dashboard UI:
kubectl argo rollouts dashboardLeave the terminal open and, using your browser, go to this address: http://localhost:3100/rollouts
Then from the second terminal, run the following command:
kubectl argo rollouts get rollout canary-demo -n canary --watchThe command uses the Argo Rollouts get command with the --watch flag to provide a live view of the canary-demo rollout in the canary namespace.
The following image shows both outputs:
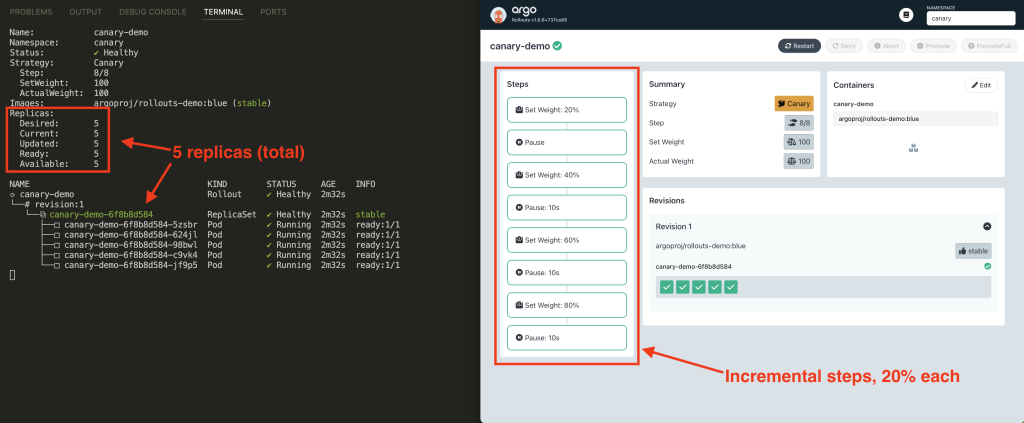
You are now at the starting point of the diagram shown in the last section. There are five replicas running the argoproj/rollouts-demo:blue image, which is currently the stable version.
To start the canary deployment, open a third terminal and use the command argo rollouts set image. This command sets the image argoproj/rollouts-demo:yellow as the new version you want to deploy:
kubectl argo rollouts set image canary-demo -n canary "*=argoproj/rollouts-demo:yellow"After a few seconds, you should see the following:
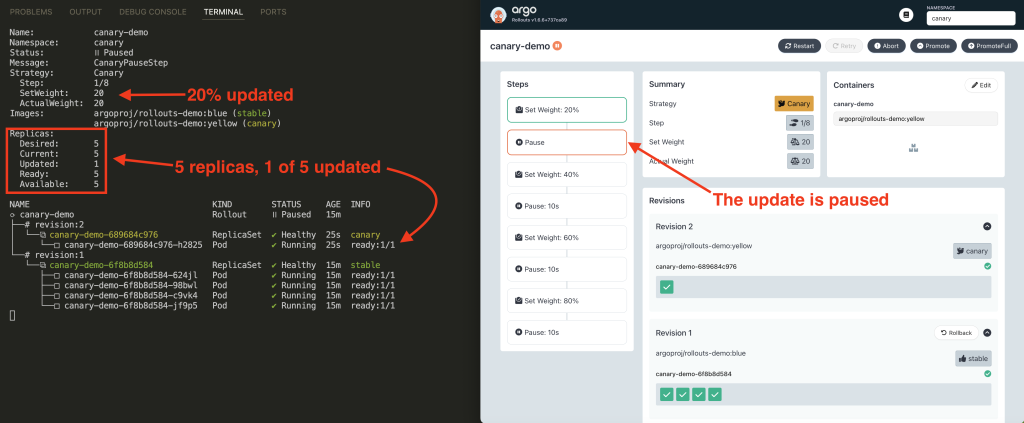
As specified in canary-rollout.yaml, 20 percent of users are using the new version (canary), and the rest are using the version that is still considered stable. The deployment is indefinitely halted as instructed.
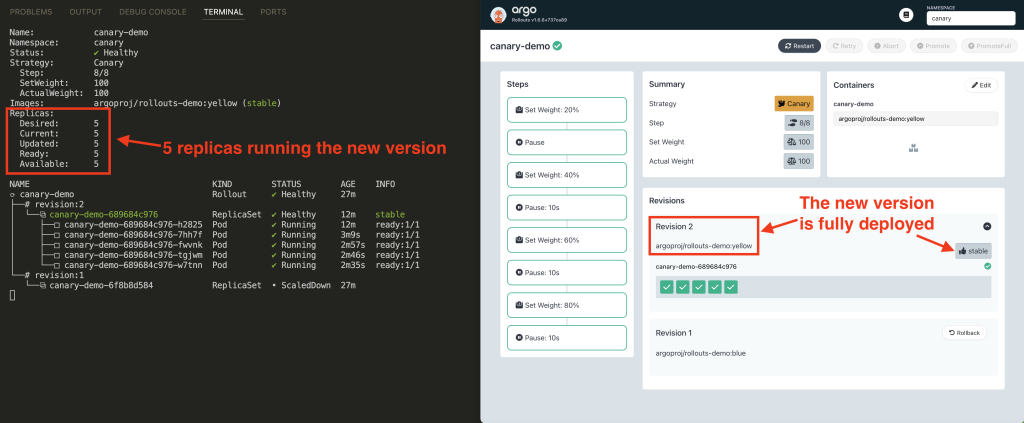
To continue, you can either use the Promote button from the UI or run the command promote from the CLI:
kubectl argo rollouts promote canary-demo -n canaryYou will see the execution of the rest of the steps with their respective ten-second pauses. Once the promotion of the canary version is finished, you will see an output similar to this:
Rolling Back a Canary Release
In this first run, everything went well. But what would happen if it didn’t?
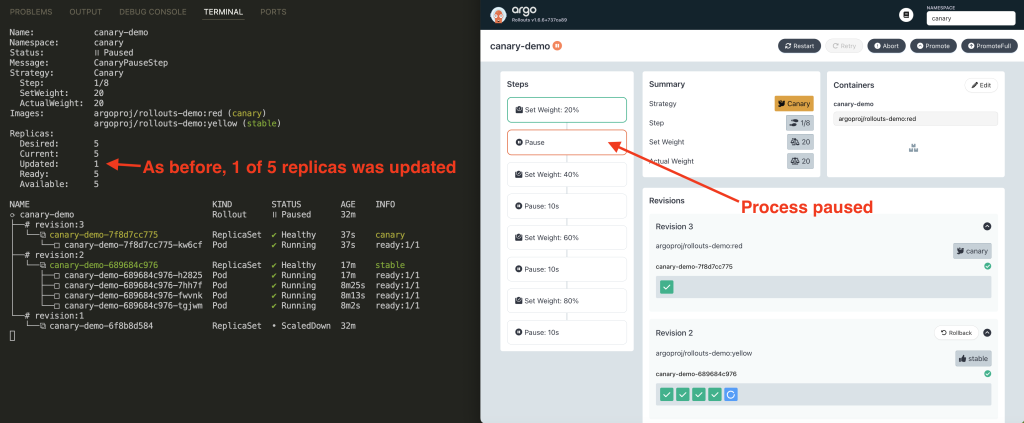
One of the advantages of canary deployments is that you can roll back the process if the new version is not yet ready for production. To simulate such a scenario, run the following command:
kubectl argo rollouts set image canary-demo -n canary "*=argoproj/rollouts-demo:red"It is the same command that you used for the first update; the difference is that it now points to the rollouts-demo:red image, which you can consider as another app version.
The output should now be like this:
The canary release is paused; however, instead of promoting the changes, roll back to the latest stable version. To do this, click the Abort button in the UI or use the command abort, which reverts all steps:
kubectl argo rollouts abort canary-demo -n canary Here’s what you will see once the rollback is completed:
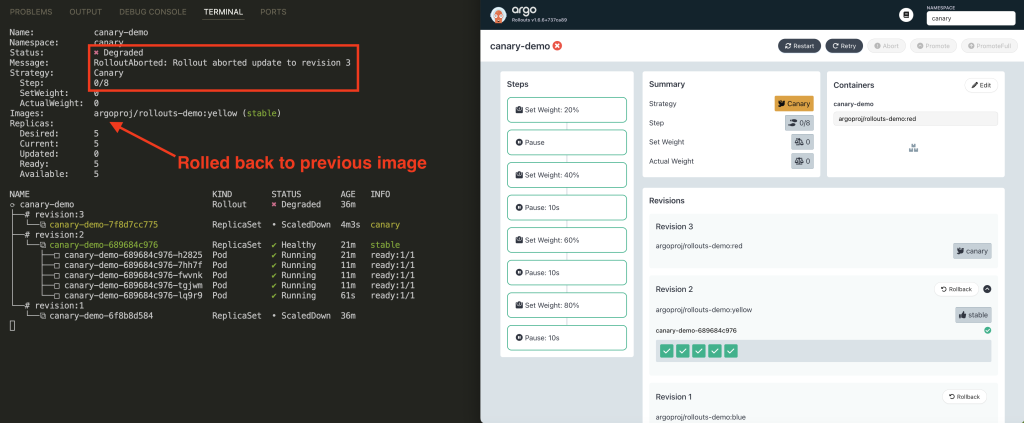
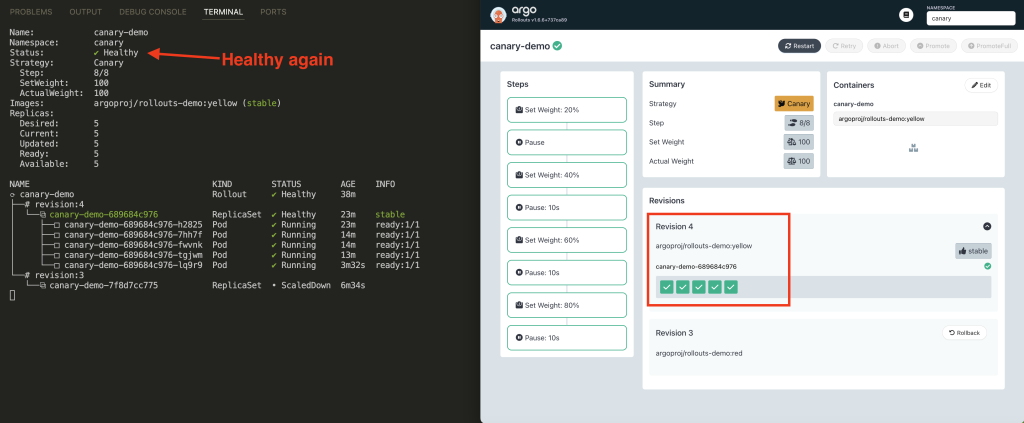
Note that although all replicas are healthy and are running the previous version, the status is degraded. This is because the update process was unsuccessful, and Argo is waiting for your next action: either insist on another update or set the current version as stable. Do the latter with this command:
kubectl argo rollouts set image canary-demo -n canary "*=argoproj/rollouts-demo:yellow"As expected, everything now looks good, and the system is ready for the next update:
Implementing Blue-Green Deployments with Argo Rollouts
Similar to the approach used for the canary deployment, you’ll use the scenario from the diagram, starting with three replicas of the application running the stable version. As before, the progressive deployment unfolds in three stages: setting up the deployment, preparing the preview environment, and executing the update.
Setting Up a Blue-Green Deployment
This time, you will find all the required files in the rollouts-demo/examples/blue-green location:
bluegreen-ingress.yamldefines an Ingress resource namedbluegreen-demowith annotations for Nginx settings.bluegreen-preview-ingress.yamldefines an Ingress resource namedbluegreen-demo-preview.bluegreen-preview-service.yamlcreates the correspondingbluegreen-demo-previewservice.bluegreen-service.yamlcreates the correspondingbluegreen-demoservice.bluegreen-rollout.yamldefines the blue-green rollout.
As before, let’s focus on the file that matters, bluegreen-rollout.yaml:
apiVersion: argoproj.io/v1alpha1
kind: Rollout
metadata:
  name: bluegreen-demo
  labels:
    app: bluegreen-demo
spec:
  replicas: 3
  revisionHistoryLimit: 1
  selector:
    matchLabels:
      app: bluegreen-demo
  template:
    metadata:
      labels:
        app: bluegreen-demo
    spec:
      containers:
      - name: bluegreen-demo
        image: argoproj/rollouts-demo:blue
        imagePullPolicy: Always
        ports:
        - name: http
          containerPort: 8080
          protocol: TCP
        resources:
          requests:
            memory: 32Mi
            cpu: 5m
  strategy:
    blueGreen:
      autoPromotionEnabled: false
      activeService: bluegreen-demo
      previewService: bluegreen-demo-preview
The structure of the rollout is very similar to that of the canary deployment, but instead of steps, there are three fields that define the process:
autoPromotionEnabled: falsedisables automatic promotion of the newReplicaSetto the active service. In this example, the process is indefinitely paused, just as it was done with the canary deployment. However, you can use a combination ofautoPromotionEnabled: trueandautoPromotionSecondsto automatically promote the rollout after a stipulated time.activeServicespecifies the active service for the blue-green deployment.previewServicesets the preview service for the blue-green deployment.
Rolling Out a New Version Using a Blue-Green Deployment
Implementing the blue-green strategy involves similar steps to implementing canary releases.
Still in the rollouts-demo directory, create a new namespace for the rollout. Here, it’s called blue-green:
kubectl create ns blue-greenRun kustomize to deploy the rollout in your Kubernetes cluster:
kustomize build examples/blue-green | kubectl -n blue-green apply -f -Check the rollout:
kubectl argo rollouts list rollouts -n blue-greenThe output is similar to this:
NAME            STRATEGY   STATUS        STEP  SET-WEIGHT  READY  DESIRED  UP-TO-DATE  AVAILABLE
bluegreen-demo  BlueGreen  Healthy        -     -           3/3    3        3           3
To monitor the process, run the command:
kubectl argo rollouts get rollout bluegreen-demo -n blue-green --watchHere’s what you see if you monitor the rollout:
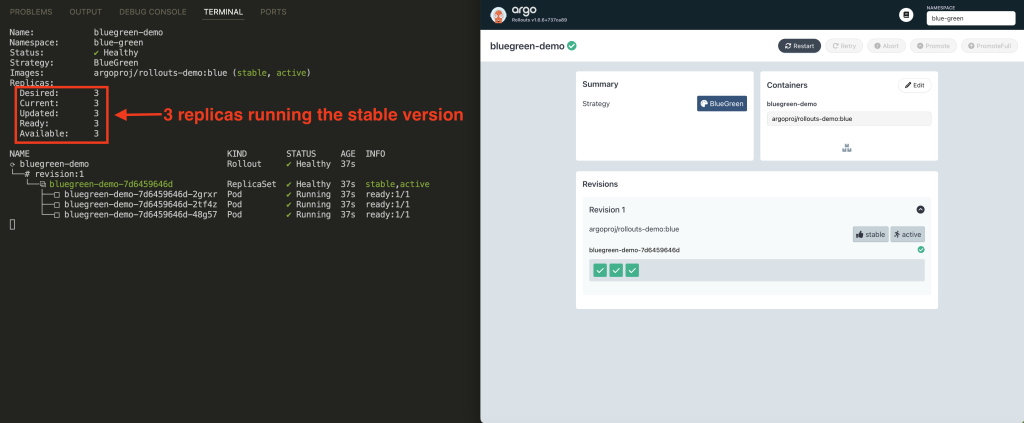
You are at the starting point, and all users use the rollouts-demo:blue image.
Begin an update using this command:
kubectl argo rollouts set image bluegreen-demo -n blue-green "*=argoproj/rollouts-demo:yellow"Here’s the output:
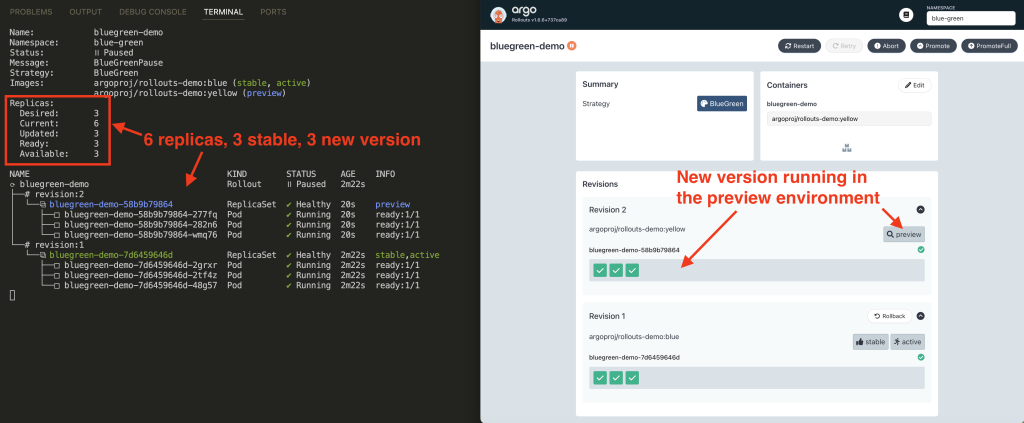
The process is paused; take a moment to review what has happened. When you started the update, Argo created the preview environment. There are now six replicas, but only three are serving users with the current stable version. The other three replicas are waiting for your next action.
Promote the new version (preview) to stable using:
kubectl argo rollouts promote bluegreen-demo -n blue-green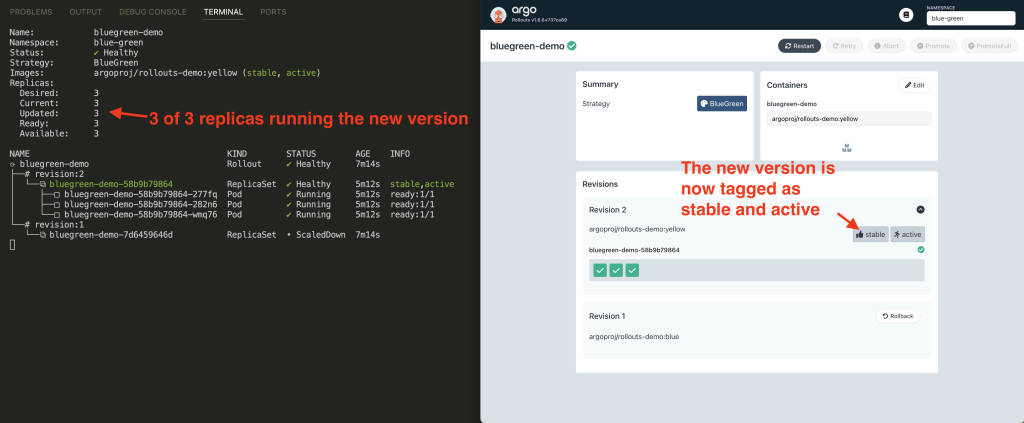
As you can see, the update proceeded without any problems.
Rolling Back a Blue-Green Deployment
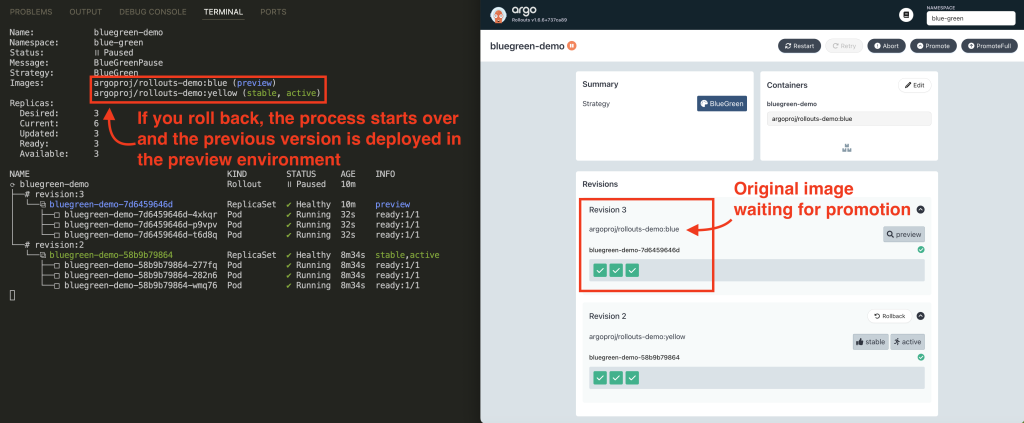
If you need to roll back to the previous version, you just have to start the process again. To do this, simply run the following:
kubectl argo rollouts set image bluegreen-demo -n blue-green "*=argoproj/rollouts-demo:blue"Now, you have to promote the image, and you will return to the previous version:
Overall, once you define your rollout and know the main commands, managing any strategy in Argo Rollouts is simple.
Canary vs. Blue-Green Strategies
In this tutorial, you learned how to implement both canary and blue-green strategies, so deciding on the optimal approach requires you to find a balance between your specific requirements and constraints and what each strategy has to offer you.
The choice between canary and blue-green implementations in Argo Rollouts depends on several factors, including app traits, available infrastructure, budget, downtime tolerance, and user experience goals. The key takeaway is that no strategy is flawless. Canary deployments mitigate risks by rolling out changes gradually but often require comprehensive monitoring. Blue-green deployments offer instant rollback and minimal downtime but are twice as resource-intensive, impacting costs.
FAQs
What is the difference between Argo CD and Argo rollout?
Argo CD is a declarative, GitOps continuous delivery tool for Kubernetes that manages application deployment using Git repositories as the source of truth. Argo Rollouts, on the other hand, is a Kubernetes controller for managing advanced deployment strategies such as blue-green, canary, and progressive delivery. While Argo CD focuses on syncing app states from Git to the cluster, Argo Rollouts enhances how updates are delivered to ensure minimal disruption.
What is rolling updates and rollbacks in Kubernetes?
Rolling updates and rollbacks in Kubernetes refer to the process of updating applications with zero downtime and reverting to a previous version if necessary. Rolling updates replace pods gradually to ensure availability, while rollbacks allow reverting to a previous stable state if something goes wrong during the update.
What is a major limitation of Argo rollouts?
A major limitation of Argo Rollouts is its limited support with Helm-based applications and lack of deep integration with custom resource definitions (CRDs), which can make it complex to adopt in environments heavily reliant on Helm or other templating tools.
What is a rollout in Kubernetes?
A rollout in Kubernetes is the process of deploying new versions of an application in a controlled and gradual manner to avoid downtime and ensure stability. It involves updating pods managed by a Deployment or similar controller, monitoring their health, and either completing the update or rolling back in case of failure.