Stacked PRs: A Better Way to Review Code
Stacked PRs work so well because they allow developers to construct a narrative with their PRs
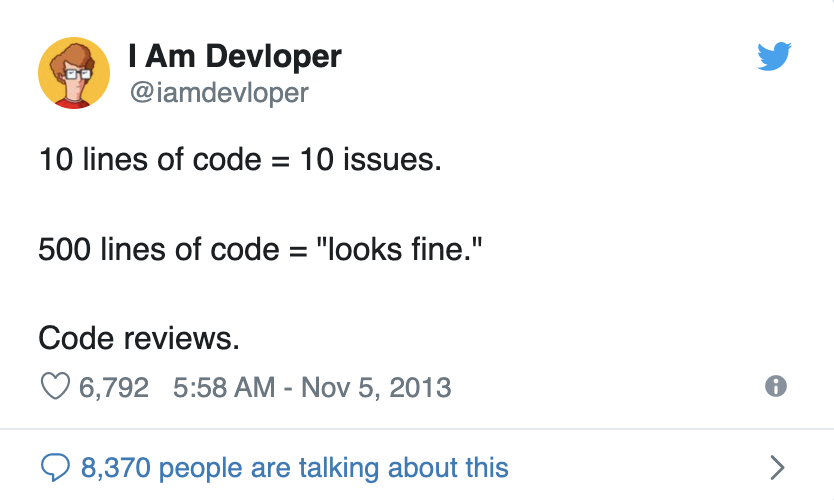
Pull request review time is not linear with the size of the change. A pull request that’s twice as large takes more than two times as long to review, or, at least, to review thoroughly. This usually means big PRs either tend to languish and grow stale or simply get rubber-stamped.
Why? I’m not entirely sure, but one of the biggest reasons is that with bigger PRs, it’s harder to untangle the story that the pull request is telling. Consequently, reviewers have to spend longer trying to understand the narrative of the pull request: why each bit of code is changing the way it is.
Often, big PRs start out as little PRs. Developers just want to fix one little bug. But, as you likely already know, little bugs aren’t always as little as they seem. What should have been a ten-line change turns into a three-hundred-line refactor. It’s easy to see how the story gets lots: why is a function so far away from where the bug is or at least, where we think the bug is changing so much?
Alternatively, big PRs are created in an attempt to keep hacking on a feature. In order to implement a button on the frontend, we have to write the frontend code. And the backend code. And the API layer glue. And the database schema migration. And now our PR for a single button is massive.
What Are Stacked PRs
On GitHub, stacked PRs work by… well… stacking your PRs. A stack is essentially a sequence of PRs: the first PR to add the database migration is created from main, the second is stacked on top of the first PR, the third is stacked on top of the second, and so on. These smaller, incremental changes form a clear narrative when viewed as stacked diffs. Each stacked PR is created with the assumption that its ancestors will be merged (though, as we’ll see below, we can handle the case where those PRs need to change as well!).
Stacked pull requests work so well in this humble author’s opinion because they allow developers to construct a narrative with their PRs. The refactoring of the library function can be done in a separate PR from the PR that needs the new functionality introduced. The backend code can build upon the database schema definitions that were done in the previous PR.
And, critically, PR stacking mean developers can start working on their second, third, and fourth PRs while the first PR is being reviewed and iterated upon.
That’s great from the reviewer’s perspective, but stacking PRs also allows the developer writing the code in the first place to move faster. They can now work on multiple parts of a feature without waiting for reviewers to approve previous PRs.
This couldn’t be more important in a world where devs are working remotely (and across who knows how many time zones). Being blocked and waiting for your coworkers is, at best, frustrating. Sometimes it’s genuinely heartbreaking. Either way, the emotional and practical costs make for a bad time.
How Stacked PRs Work
We’ve taken a “git native” approach to creating stacked pull requests, making them work smoothly with GitHub and common PRs code workflows. Stacked branches are just normal Git branches that were branched from their stack parent.
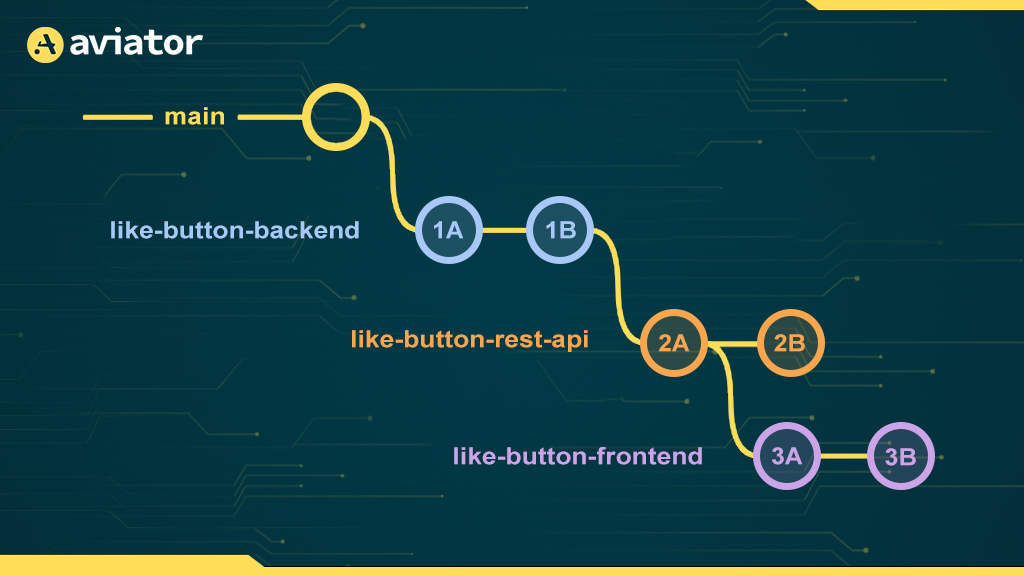
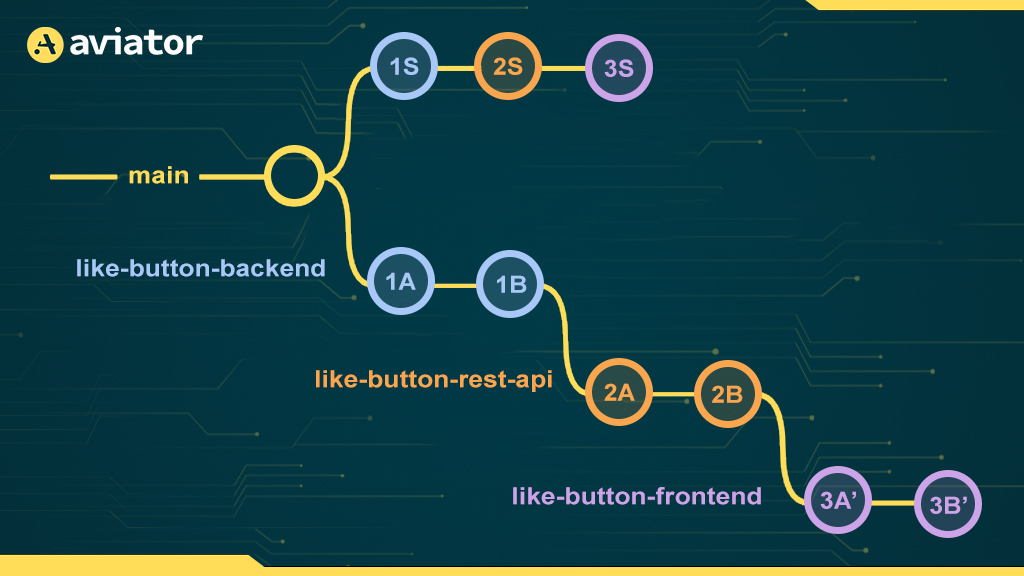
If that sounds confusing, let’s look at a quick (and realistic!) example. We want to add a like button to the website we’re building, and it makes sense to do it in three phases:
- Add backend service code (e.g., database schema changes and model logic)
- Add a REST API interface
- Implement the frontend
Without GitHub stacked PRs, we’d have to implement this in one big PR or wait for each PR to be approved and merged before we could start on the next piece of the feature. Instead, we can open three separate PRs and have them reviewed both independently and in parallel (possibly even by different people!).
The Stacked Branching Strategy
👉 In Git, a branch is like a linked list of commits. The branch name (such as main or like-button-rest-api) is essentially just a pointer to a particular node in the linked list.
† Technically, a Git branch is closer to a directed acyclic graph due to merge commits, but for this discussion, we’ll assume there are no merge commits on the stack.
Since we want to open three different PRs, we need to create three different branches. To do this, we’ll simply create each new branch off of the previous branch.

Updating and Committing to Stacked Branches
One of the primary reasons to use Aviator’s stacked PRs is to enable easier code review which means that it’s actually pretty likely that you’ll have to modify branches that have other branches stacked on top of them.
Modifying a stacked branch is just like modifying any other branch: perform your modifications and create a new commit!
However, if you commit to a branch that has children, you end up in a scenario where the parent and child branches have diverged!
In the diagram, like-button-frontend doesn’t contain the commit 2B which we’ve added to like-button-rest-api which means that all of the Continuous integration and checks we’re running for like-button-frontend are now out of date!
To fix this, we can rebase like-button-frontend on top of like-button-rest-api. This effectively “replays” commits 3A and 3B on top of 2B:
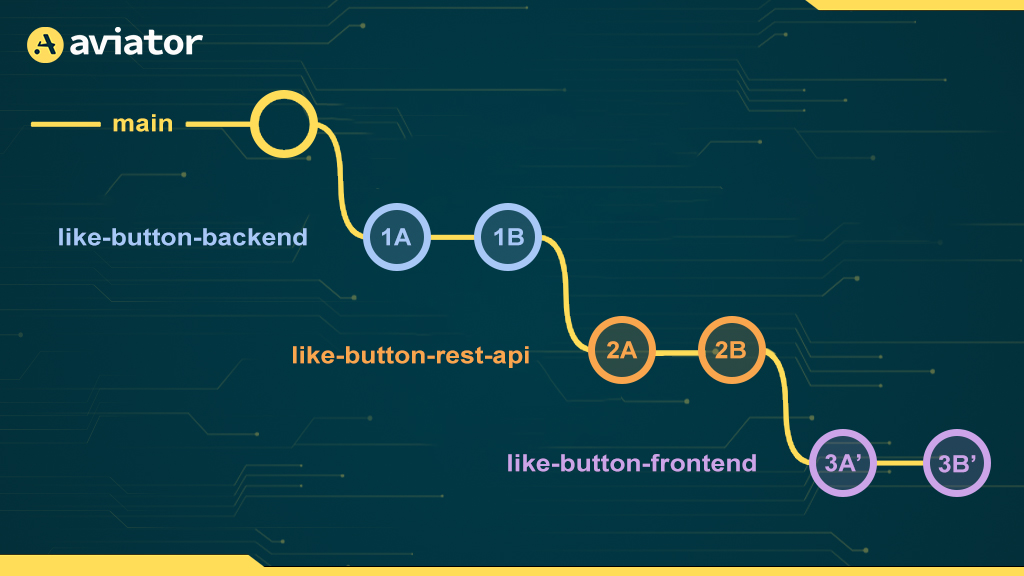
👉 Here, we’ve notated the rebased commits as 3A' and 3B' to illustrate the fact that, according to Git, these are actually new commits that are different from the old 3A and 3B. This is because Git considers the parents of a commit as part of the identity (i.e., hash) of that commit. Since 3A' has parent 2B and 3A has parent 2A, they are different commits. This is why rebasing requires a force push: Git thinks we’re losing 3A and 3B and wants to make sure we mean to erase those commits from the branch.
Stacked Branches Become Stacked PRs
Since GitHub doesn’t have native support for PR stacking, we have to be clever when it comes time to open PRs. If we opened a PR from like-button-frontend into main, GitHub would show the diff from all three branches, which defeats the whole point of using Stacked PRs!
Instead, we open PRs in a linked-list-like fashion:
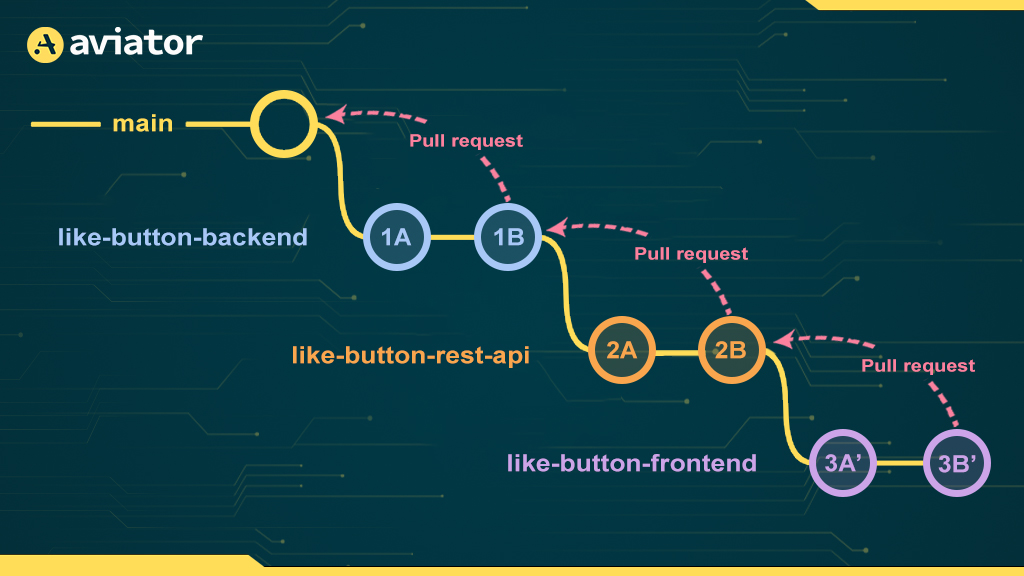
This turns out to work out really well! The diff for like-button-frontend only contains the changes from commits 3A and 3B as intended!
Merge Time! (Oh, Wait Turns Out It’s Hard 🤧)
Merging is a very complicated subject, and to talk about it, we need to take a quick digression into the “squash merge” strategy.
A “squash merge” isn’t technically a merge in the Git sense. Instead, a squash merge generates a new commit that contains the diff from the commits on a branch and adds that commit to main. GitHub (and many other Git hosts) will consider the branch “merged” (and close the associated pull request), but Git doesn’t actually consider the commits from the original branch as merged into main since the squash-merge-commit isn’t technically related to any of the original commits.
👉 An actual Git “merge commit” is a commit that has two (or more!) parents: the mainline branch (i.e., the branch that is being merged into) and the branch(es) that are being merged into the mainline. Git then considers the history of the mainline branch to contain the commits that were merged in. Many codebases use squash commits instead of merge commits because the history of individual feature branches is often messy and uninteresting.
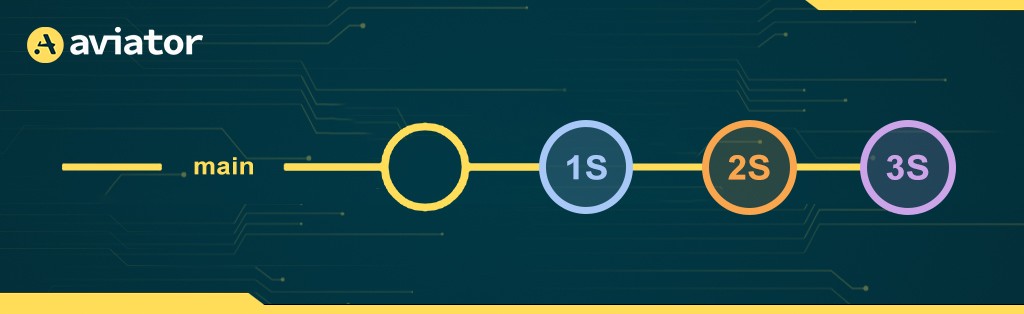
Ultimately, this means we can’t merge each PR in order (at least while using squash commits). Let’s consider the branch diagram after we merge the first branch in the stack:
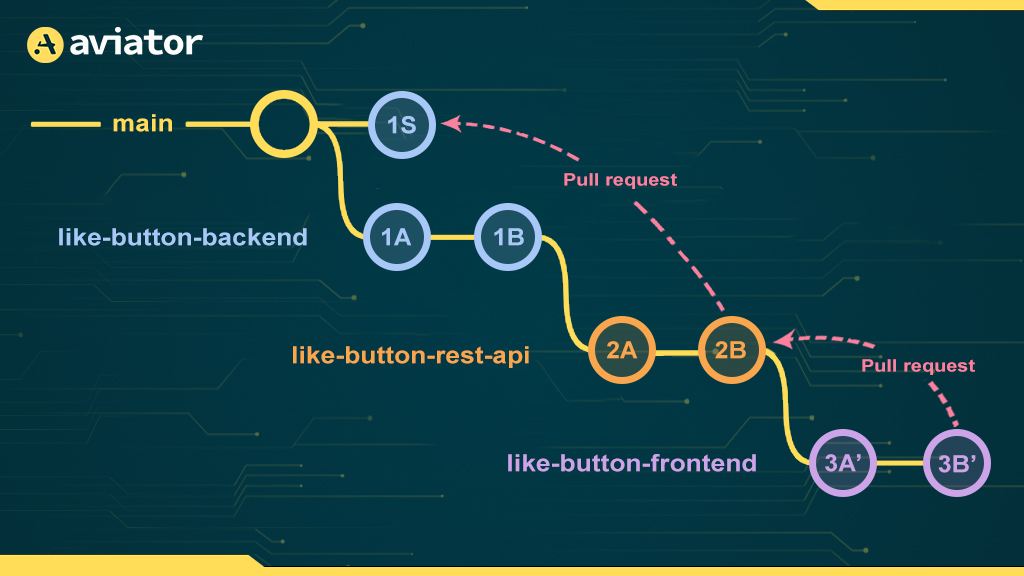
Here, we’ve added the commit 1S to main which represents the “squash merge” of the like-button-backend branch. But, critically, Git doesn’t actually consider the like-button-backend branch merged, even though GitHub does.
Now when we want to merge the second branch, like-button-rest-api, into main, Git tries to calculate all of the commits that it needs to merge into main. Since 1A and 1B are part of the history of like-button-rest-api, and not main, ultimately the squash merge will consist of the diff of 1A, 1B, 2A, and 2B. Since 1A and 1B have already been applied, this almost always results in a merge conflict.
Merge Time, for Real!
There are a few ways to get around the merge issues presented above.
One option is to only merge the top branch of the stack (like-button-frontend in the example above). This is what Aviator MergeQueue does (unless using our fast-forward mode see below for details!).
Another option is to rebase each stacked PR after its parent is merged. This essentially means that we replay (git cherry-pick) the commits from a stacked branch on top of the squash commit generated by merging its parent branch:

This can cause some issues in high-throughput repositories where Aviator’s parallel merge queue mode is enabled. Since we can’t start rebasing the next PR until the previous one is merged, the merge process becomes serialized on running CI for each branch in the stack (since CI is re-triggered after rebasing a branch).
Bonus: Aviator’s Fast-forward Mode
Aviator’s fast-forward mode is a subset of parallel mode that works by only fast-forwarding your mainline branch to commits with known-good CI states.
👉 We talked about how Git branches are just pointers to commits above. In fast-forward mode, we simply move this pointer forward to a commit that we’ve already validated (instead of merging a PR, which generates a new commit that hasn’t already been validated).
This means we run the validation in a new branch where we’re able to squash each branch into a single commit:
Once the checks pass for the validation branch, we fast-forward main to 3S. This means that the commit that ends up in main is the exact same (i.e., same commit hash) as the one we validated:
Aviator will automatically mark each of the individual PRs we created early as closed.
Best Practices for Working with Stacked PRs
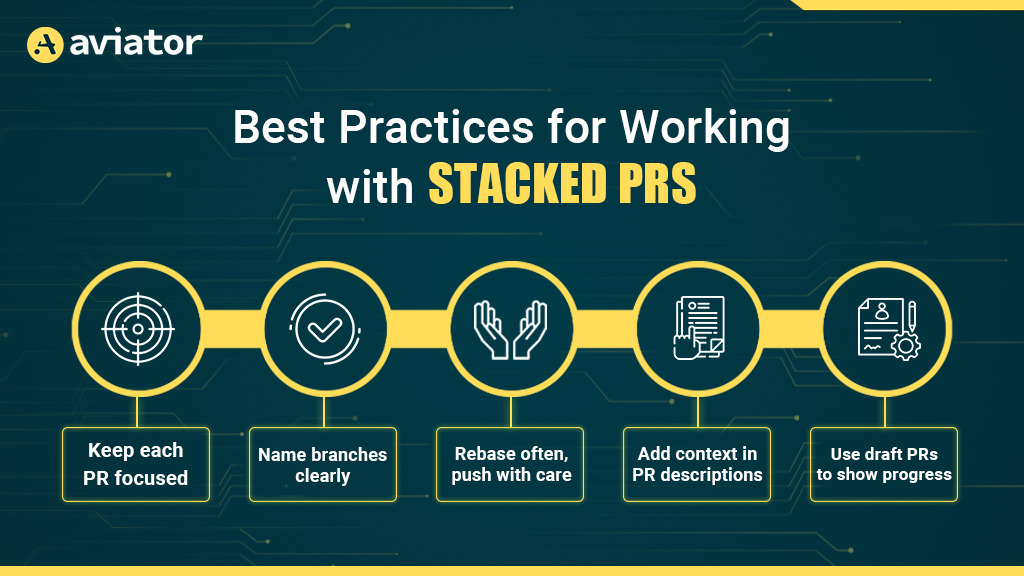
Stacked PRs work best when you keep a few simple habits in mind:
- Keep each PR focused. Try to make each pull request do one thing well, whether it’s adding a new model, updating an API route, or changing some frontend behavior. This makes it easier for reviewers to understand and for you to debug if something breaks.
- Name your branches clearly. A good branch name helps you (and others) keep track of what each PR is about. Something like
feature-user-auth-apiorrefactor-payment-handlergoes a long way when you’re juggling multiple branches. - Rebase often, push with care. If you’re updating a parent PR, remember to rebase the children on top of it. Yes, that means force-pushing but it also keeps your stack clean and your CI happy.
- Add context to your PR descriptions. Even though your PRs are smaller, reviewers still need to understand why a change is being made. A short sentence or two explaining the purpose of the PR and how it fits in the larger picture helps a ton.
- Use draft PRs to show progress. If you’re still working through parts of the stack, marking PRs as drafts makes it clear what’s ready for review and what’s still cooking.
FAQs
What is Stacking in Git?
Stacking means creating a series of dependent branches, where each builds on top of the previous one. It helps break large changes into smaller, reviewable units.
How to Split PR into Two?
To split a PR into two, create a new branch from the current PR, move some changes into this new branch (using git reset, git add -p, or git cherry-pick), commit and push both branches and open two separate PRs.
How to Make PR Smaller?
To make PR smaller:
1. Tackle one logical change per PR.
2. Use stacked PRs.
3. Split feature into backend/frontend/API layers.
4. Avoid unnecessary refactors in the same PR.
Aviator MergeQueue
MergeQueue is an automated queue that manages the merging workflow for your GitHub repository to help protect important branches from broken builds. The Aviator bot uses GitHub Labels to identify Pull Requests (PRs) that are ready to be merged, validates CI checks, processes semantic conflicts, and merges the PRs automatically.