Comparing Flux CD, Argo CD, and Spinnaker
A comprehensive comparison of the continuous delivery frameworks. Walkthrough the architectural differences and learn how to setup Spinnaker, ArgoCD and FluxCD.
Continuous delivery (CD) tools play a crucial role in modern software development workflows, enabling teams to automate the process of deploying applications. Among the available CD tools, Flux CD, Argo CD, and Spinnaker stand out for their unique features and capabilities. This article provides an in-depth comparison of these three tools. In it, we’ll explore their architectures, key features, integration capabilities, and ideal use cases, and we’ll go into each tool’s basic implementation.
Comparing Flux CD, Argo CD, and Spinnaker is essential for organizations seeking the right CD tool to fit their specific requirements. By understanding the architectural differences, key features, and integration capabilities of each tool, teams can make informed decisions and optimize their deployment workflows.
Brief introduction to Flux CD, Argo CD, and Spinnaker
Flux CD, Argo CD, and Spinnaker are prominent players in the field of CD tools — each offers a unique approach to application deployment and management.
- Flux CD: Flux CD, or Flux, is an open-source tool that follows the GitOps methodology, where the desired state of the system is controlled in Git repositories. It continuously monitors these repositories for changes and automatically applies them to the Kubernetes cluster.
- Argo CD: Argo CD is another open-source tool designed for Kubernetes-native continuous deployment. It utilizes declarative YAML manifests in a GitHub repository to define the desired application state and synchronizes that with the actual state in the Kubernetes cluster.
- Spinnaker: Spinnaker is a more compact CD platform that provides support for multicloud deployments. It offers advanced features such as automated canary analysis and pipeline orchestration, making it suitable for complex deployment scenarios.
Architecture
Flux CD
Flux is constructed with GitOps Toolkit components. In the Flux ecosystem, those components are Flux Controllers, composable APIs, and reusable Go packages. They’re used for developing CD workflows on Kubernetes using GitOps principles.
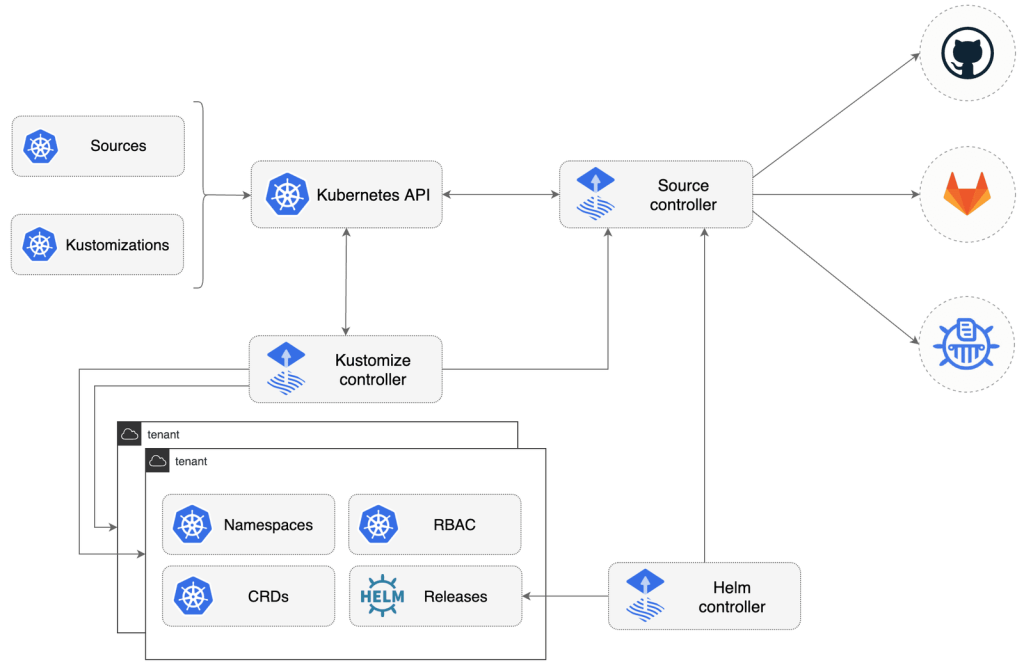
Key components of Flux CD include the source controller, which establishes a collection of Kubernetes entities, enabling cluster administrators and automated operators to manage Git and Helm repository tasks through a dedicated controller.
You have the option of using the toolkit for expanding Flux capabilities and creating custom systems tailored for continuous delivery. A recommended starting point for this is the source-watcher guide.
Argo CD
Argo CD operates as a Kubernetes controller, continually monitoring active applications and comparing their existing operational state with the intended target state defined in a Git repository. Applications that do not match the desired state are flagged as out of sync. After that, Argo CD provides reporting and visualization of these disparities, offering options for automatic or manual synchronization to bring the operational state in line with the desired target state.

Any modifications made to the desired target state in the Git repository are automatically applied and reflected in the specified target environments (usually a Kubernetes cluster). All the changes made are also displayed in the Argo CD UI.
This architecture ensures automated application deployment and lifecycle management, aligning with the GitOps pattern of using Git repositories as the source of truth for defining application states. Argo CD supports various methods of specifying plain directories of YAML/JSON manifests, Kubernetes manifests, including kustomize applications, Helm charts, and Jsonnet files.
Argo CD provides a CLI for automation and integration with CI pipelines, webhook integration with version control systems, and so on.
Spinnaker
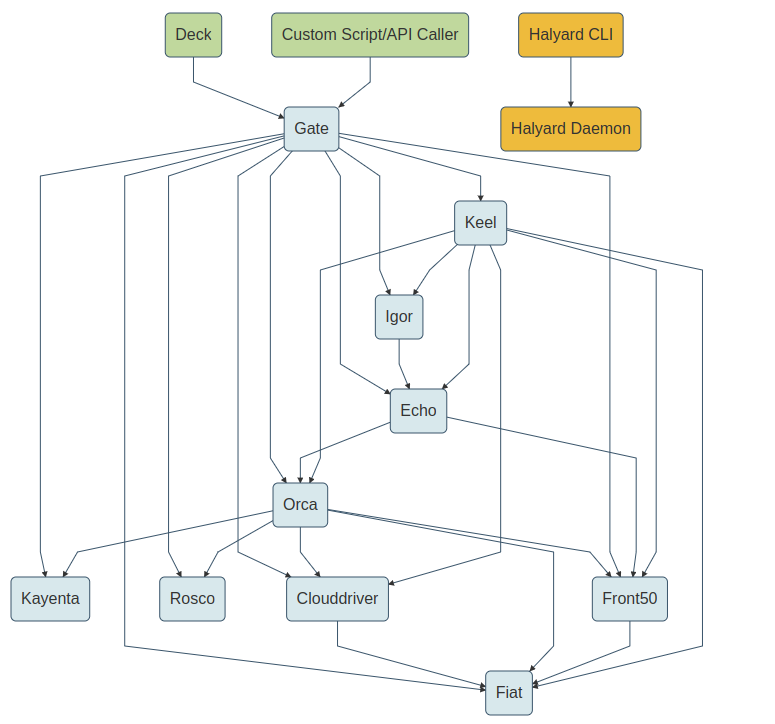
Spinnaker employs a microservices architecture comprising several components that interact to facilitate the deployment process. Core components of Spinnaker include the Deck UI for user interaction, the Gate API for authentication and authorization, and various cloud-specific Clouddriver services for interacting with cloud providers.
The diagram below illustrates the interdependencies among microservices. The green rectangles denote “external” elements, such as the Deck UI, a single-page JavaScript application operating within your web browser. The gold rectangles signify Halyard components, which are utilized solely during the configuration of Spinnaker.
Key features
Flux CD
- GitOps-based continuous delivery: Flux CD leverages Git repositories as the source of truth for defining the desired state of the system.
- Automated deployments: Flux CD automates the deployment process based on changes detected in Git repositories.
- Git repository synchronization: Flux CD synchronizes Kubernetes resources with Git repositories, ensuring consistency between environments.
Argo CD
- Declarative GitOps application deployment: Argo CD enables declarative application deployments using YAML manifests stored in Git repositories.
- Rollback and version control: Argo CD supports rollback functionality and maintains version control for application configurations.
- SSO integration: Argo CD provides integration with single sign-on (SSO) systems for authentication and access control.
Spinnaker
- Multi-cloud support: Spinnaker offers native support for multiple cloud providers, allowing easy deployment across heterogeneous environments.
- Automated canary analysis: Spinnaker facilitates automated canary analysis for evaluating new versions of applications before pushing them to production.
- Pipeline orchestration: Spinnaker provides robust pipeline orchestration capabilities, enabling complex deployment workflows.
Integration and extensibility
Flux CD
- Integration with Kubernetes and Helm: Flux CD integrates easily with Kubernetes and Helm for managing containerized applications.
- Extensibility through custom controllers: Flux CD allows extending the Kubernetes API with custom resource definitions and validation webhooks.
Argo CD
- Kubernetes native integration: Argo CD is tightly integrated with Kubernetes, leveraging custom resource definitions (CRDs) for managing application deployments.
Spinnaker
- Integration with major cloud providers: Spinnaker provides out-of-the-box integration with major cloud providers such as AWS, Google Cloud Platform (GCP), and Microsoft Azure.
- Extensibility through custom stages and plugins: It supports extensibility through custom stages and plugins, allowing users to integrate with additional services and tools.
Use cases and best practices
Flux CD
Flux CD is suitable for small- to medium-scale Kubernetes deployments. It’s ideal for teams practicing GitOps methodologies, where the entire deployment process is managed through version-controlled Git repositories. It’s more flexible than Argo CD.
Argo CD
Argo CD is good for DevOps teams looking for Kubernetes-native continuous deployment solutions. It’s recommended for CI/CD pipelines requiring declarative application definitions stored in Git repositories.
Spinnaker
Spinnaker is recommended for enterprises with complex, multi-cloud deployment requirements because of its robust multi-cloud support. It’s ideal for organizations needing advanced CD workflows, including canary deployments and automated analysis. It’s more flexible than Flux CD and Argo CD but harder to get started with.
Examples of how to use Flux CD, Argo CD, and Spinnaker
This section will cover the basics of how to set up and use Flux CD, Argo CD, and Spinnaker — it’s meant to give you an idea of what you’re getting into before you implement a CD tool in a real project. To follow the steps, you should have a cluster running.
How to use Flux CD
Using Flux CD involves setting up a Git repository to store your Kubernetes manifests and configuring Flux CD to synchronize these manifests with your Kubernetes cluster. Here’s a step-by-step guide:
Step 1: Install Flux CD
You need to install the Flux CLI to run commands on. With Bash for macOS and Linux, you can use the following command (you can get other installation methods in the CLI install documentation):
curl -s https://fluxcd.io/install.sh | sudo bashYou can check whether it installed properly with the following command:
flux check --pre # use sudo if you get error like "connection refused" Step 2: Configure GitHub credentials
Flux needs your GitHub credentials in order to log in and perform some actions on your repository. Export your GitHub personal access token and username:
export GITHUB_TOKEN=<your-token>
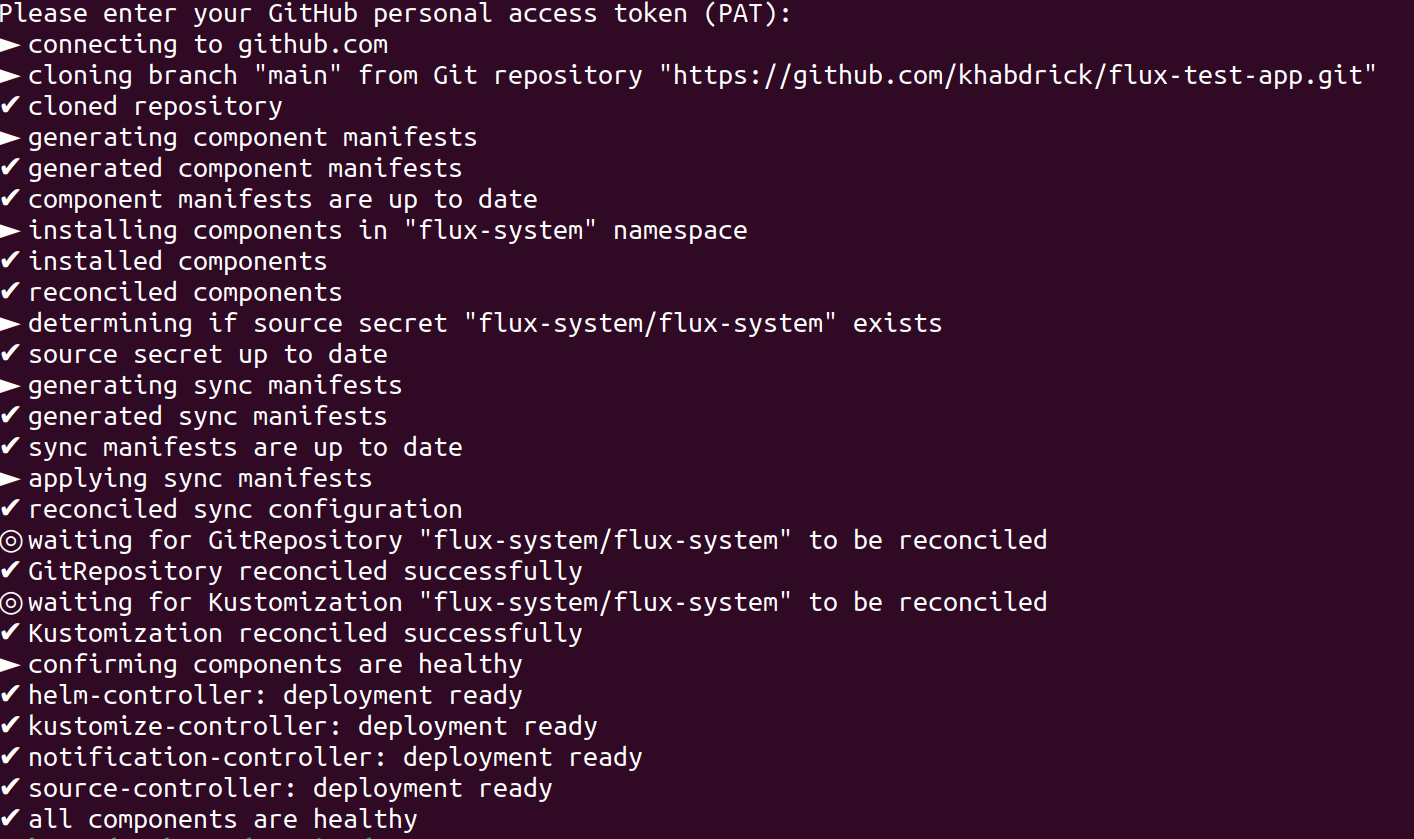
export GITHUB_USER=<your-username>Step 3: Install Flux CD onto your cluster
The flux bootstrap github command sets up the Flux controllers on a Kubernetes cluster and sets them to synchronize the cluster’s state with a Git repository. It also uploads the Flux manifests to the Git repository and sets up Flux CD to automatically update itself based on changes in the Git repository.
To do do this run the following command:
echo $GITHUB_TOKEN | flux bootstrap github \

  --owner=$GITHUB_USER \

  --repository=<github-repo-name> \

  --branch=main \

  --path=./flux-clusters \

  --personal

  --private=false
The bootstrap command above does the following:
- Creates a Git repository <github-repo-name> (in my case, flux-test-app ) on your GitHub account.
- Adds Flux component manifests to the repository.
- Deploys Flux components to your Kubernetes cluster. You can run kubectl get all -n flux-system to check out the components.
- Configures Flux components to track the path /flux-clusters in the repository.
- –private=false flag is used to create a public repository.
Your output will look like this:
Step 4: Add Podinfo repository to Flux CD (or any repository you want)
First, clone the repository you created (in my case, flux-test-app) to your local machine:
git clone https://github.com/$GITHUB_USER/flux-test-app

cd flux-test-app
Now run the following to create a GitRepository manifest pointing to the github.com/stefanprodan/podinfo master branch. Podinfo is a web application written in Go.
flux create source git podinfo \

  --url=https://github.com/stefanprodan/podinfo \

  --branch=master \

  --interval=2m \

  --export > ./flux-cluster/podinfo-source.yaml
In the command above:
- A GitRepository named podinfo is created.
- The source-controller checks the Git repository every two minutes, as indicated by the –interval flag.
- It clones the master branch of the https://github.com/stefanprodan/podinfo repository.
- When the current GitRepository revision differs from the latest fetched revision, a new Artifact is archived.
After the command is run, you should have the corresponding file podinfo-source.yaml.
Step 5: Deploy the podinfo application using GitOps
Configure Flux CD to build and apply the kustomize directory located in the podinfo repository. This directory contains the Kubernetes deployment files.
Use the following flux create command to create a Kustomization that applies the podinfo deployment:
flux create kustomization podinfo \

  --target-namespace=default \

  --source=podinfo \

  --path="./kustomize" \

  --prune=true \

  --wait=true \

  --interval=10m \

  --retry-interval=2m \

  --export > ./flux-cluster/podinfo-kustomization.yaml
In the command above:
- A Flux GitRepository named podinfo is created that clones the master branch and makes the repository content available as an Artifact inside the cluster.
- A Flux Kustomization named podinfo is created that watches the GitRepository for Artifact changes.
- The Kustomization builds the YAML manifests located at the specified location in –path=”./kustomize”, validates the objects against the Kubernetes API, and applies them on the cluster.
- The –interval=10m flag, every ten minutes, sets the Kustomization to run a server-side dry-run to detect and correct drift inside the cluster.
- The –retry-interval=2m specifies the interval (two minutes) at which to retry a failed reconciliation.
- When the Git revision changes, the manifests are reconciled automatically. If previously applied objects are missing from the current revision, these objects are deleted from the cluster when enabled with –prune=true.
After the command is run you should have the corresponding file podinfo-kustomization.yaml.
Now commit and push the manifests to the repository:
git add -A && git commit -m "Add podinfo manifests"

git push
After about ten minutes, your application should be running on your cluster. You can check with the following command:
sudo kubectl -n default get deployments,servicesOutput:

How to use Argo CD
To use Argo CD, you typically install Argo CD onto your Kubernetes cluster, deploy your applications to Kubernetes, configuring Argo CD to watch your application manifests in a Git repository, and then let Argo CD synchronize the desired state of your applications with the actual state running in your cluster.
Here’s a basic guide to get started:
Step 1: Install Argo CD onto your Kubernetes cluster
You can install Argo CD using Kubernetes manifests. Below is an example of how you can install Argo CD using kubectl:
kubectl create namespace argocd

kubectl apply -n argocd -f https://raw.githubusercontent.com/argoproj/argo-cd/stable/manifests/install.yaml
Also install the Argo CD CLI to run the argocd commands in later steps.
Now change the argocd-server service type to LoadBalancer with the following command:
kubectl patch svc argocd-server -n argocd -p '{"spec": {"type": "LoadBalancer"}}'Step 2: Access the Argo CD UI
Once it’s installed, you can access the Argo CD UI via a port forward or by exposing the service externally. Here’s how to port forward:
kubectl port-forward svc/argocd-server -n argocd 8080:443You can then access the Argo CD UI by navigating to http://localhost:8080 in your web browser.
The initial password for the admin (login username) account is automatically generated and saved as plain text in the password field within a secret named argocd-initial-admin-secret in your Argo CD installation namespace. To easily obtain this password, you can run the following argocd admin command:
argocd admin initial-password -n argocdUsing the username admin and the password from above, log in to Argo CD’s host:
argocd login https://localhost:8080/Step 3: Creating an app on Kubernetes
First, you need to set the current namespace from default to argocd by running the following command:
kubectl config set-context --current --namespace=argocdNext, deploy a sample application to the Kubernetes cluster using YAML manifests. This manifest is on GitHub so you can check out the content.
Create the example application with the following command:
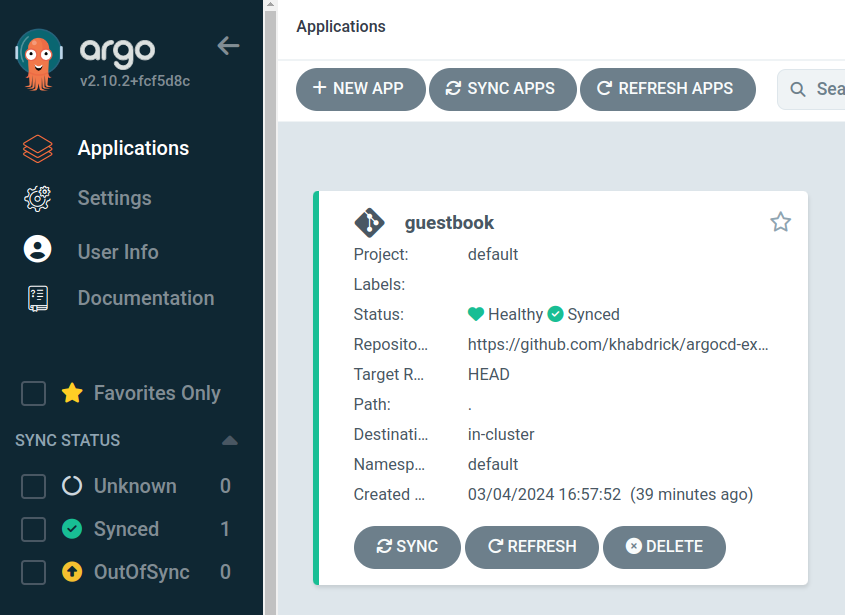
argocd app create guestbook --repo https://github.com/khabdrick/argocd-example-apps.git --path . --dest-server https://kubernetes.default.svc --dest-namespace defaultIf you’re using a different repository, update https://github.com/khabdrick/argocd-example-apps.git –path . in the code as appropriate.
In the Argo CD UI, you will see that your app has been deployed and synchronized successfully.
Argo CD will now start monitoring the Git repository for changes and automatically synchronize the application to the desired state specified in the manifests. It takes about three minutes for Argo CD to refresh automatically and synchronize and apply changes in the repository.
This is a basic guide to get started with Argo CD. Depending on your specific use case and requirements, you may need to explore more advanced features and configurations.
How to use Spinnaker
To install Spinnaker, you need Halyard. Halyard is a tool used to configure and manage Spinnaker deployments. This section outlines the process of setting up Spinnaker with a MySQL database on Kubernetes. We’ll start by running Halyard in a Docker container.
Note: For this section, I will use a Kubernetes cluster from Docker Desktop.
Setting up a MySQL database
To begin, deploy a MySQL database using Kubernetes and the MariaDB Docker image.
(Try to use a more secure password.)
kubectl run mysql --image=mariadb:10.2 --env="MYSQL_ROOT_PASSWORD"="123" --env="MYSQL_DATABASE"="front50"This command creates a MySQL instance named mysql, setting the root password and creating a database named front50. This will be used to configure Front50. Front50 serves as the persistent storage and retrieval mechanism for Spinnaker’s pipeline configurations, application details, and other metadata.
Configuring Halyard
Next, we configure Halyard by creating a container that runs Halyard:
docker run --name halyard --rm \

    -v ~/.kube:/home/spinnaker/.kube \

    -it us-docker.pkg.dev/spinnaker-community/docker/halyard:stable
In another terminal window, enter the Halyard container:
docker exec -it halyard bashOnce inside the Halyard container, configure the Spinnaker version:
hal config version

hal config version edit --version <input-version>
Enable Kubernetes as a provider:
hal config provider kubernetes enableAdd a Kubernetes account; docker-desktop in the command below is the context of the cluster running on Docker Desktop:
hal config provider kubernetes account add my-account --context docker-desktopNow associate your Kubernetes account (my-account) with Halyard:
hal config deploy edit --type distributed --account-name my-accountConfigure storage using Redis. This will be changed later, since Halyard doesn’t allow setting MySQL directly:
hal config storage edit --type redisNow enable artifacts. The Artifacts feature in Spinnaker allows the system to manage and deploy artifacts (such as Docker images, JAR files, and Debian packages) as part of your deployment pipelines:
hal config features edit --artifacts trueConfiguring Spinnaker to use MySQL
Next, you have to configure Spinnaker to use the MySQL database. Create the /home/spinnaker/.hal/default/profiles/front50-local.yml file and insert the following configurations:
sql:
  enabled: true
  connectionPools:
    default:
      default: true
      jdbcUrl: jdbc:mysql://MYSQL_IP_ADDRESS:3306/front50
      user: root
      password: 123
  migration:
    user: root
    password: 123
    jdbcUrl: jdbc:mysql://MYSQL_IP_ADDRESS:3306/front50
spinnaker:
  redis:
    enabled: false
Replace MYSQL_IP_ADDRESS with the appropriate IP address. Also make sure that other credentials match with what you used to deploy MySQL earlier.
You can get the MYSQL IP by running the following command (outside the Hayland container):
kubectl get pods -o wideApply the deployment (in the Hayland container). This command is used to apply the changes made to the Spinnaker configuration and deploy or update Spinnaker in the target environment:
hal deploy applyNow you can check to see whether the pods are running completely:
kubectl get pods -n spinnakerWe need the deck and gate pods to be running so we can access the Spinnaker UI.
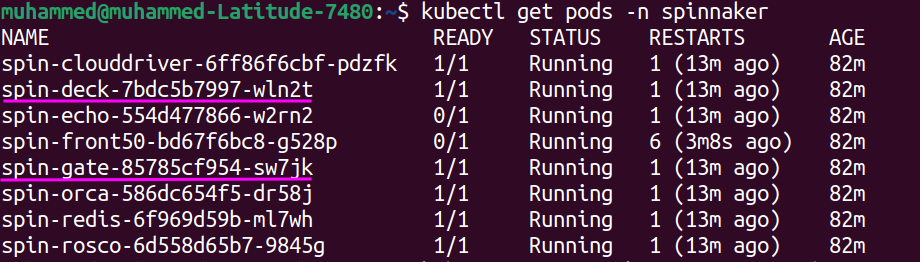
Now we can forward the deck and gate pods so that we can access it on the browser. Do this with the following command:
kubectl -n spinnaker port-forward <spin-deck-pod-name> 9000On another terminal, run the gate :
kubectl -n spinnaker port-forward <spin-gate-pod-name> 8084Now you can access the Spinnaker UI at http://localhost:9000/ and start developing your pipelines.

Conclusion
Flux CD, Argo CD, and Spinnaker offer distinct advantages and cater to different use cases within the realm of continuous delivery. By evaluating their architectures, features, and integrations, you can make informed decisions about the best way to automate your deployment and delivery processes.