Implementing canary releases in Kubernetes with Istio

A canary release is a testing strategy that involves rolling out new versions of applications gradually, so engineers can test new features in production with a limited set of users before making them available to everyone. In the Kubernetes ecosystem, combining Istio with Kubernetes is a good way to implement canary releases.
This article will guide you through the steps necessary to set up a canary release strategy using Istio on Kubernetes.
Prerequisites
Before proceeding, ensure that you have the following:
- A Kubernetes cluster that’s up and running.
- A Minikube cluster running:
minikube start --driver=docker kubectlCLI installed and configured.
Introduction to canary deployment
Named after the “canary in a coal mine” concept, canary deployments allow engineers to release a new version of software to a small subset of users or servers before making it available to an entire user base. In this way, the method functions as an early warning system, allowing teams to detect potential problems before those problems can have a huge impact.
One effective way to select a subset of users for a canary deployment is by geographic region. This method is useful for services with a global user base, where certain regions may not get to use the new feature. It makes more sense to deploy to the region that uses the feature.
Introduction to Istio
Istio is an open-source service mesh that provides a way to control how microservices share data with one another. At its core, Istio is designed to handle issues that stem from deploying and managing a microservices architecture, especially at scale.
As applications grow to multiple services across different environments, they often become harder to manage and secure. Istio addresses these challenges by providing a comprehensive suite of tools focused on traffic management, security, and observability.
One of Istio’s core capabilities is traffic management. In this tutorial, we’ll demonstrate controlling the flow of traffic and API calls between services with fine-grained routing rules. We’ll use Istio to divert a small percentage of traffic to the new version of an application while directing the majority to the stable production version.
How Istio works
Istio integrates with Kubernetes, but it can also be used with other orchestration platforms. It operates at the platform layer, controlling how different parts of an application interact with one another. The primary components of Istio include:
- Envoy proxy: Istio uses a proxy called Envoy to manage traffic at the network level. Envoy proxies are deployed as sidecars to services, meaning that they are run in the same Kubernetes pod as the service. These proxies mediate all inbound and outbound traffic, adding a layer of abstraction and control.
- Control plane: The control plane manages and configures proxies to route traffic. It also configures mixers to enforce policies and collect telemetry. The control plane offers a single point of control that can dynamically alter the behavior of the network.
- Pilot, Citadel, and Galley: These components serve distinct purposes in the Istio architecture. Pilot translates high-level routing rules that control traffic behavior into configurations that the Envoy proxies can understand. Citadel provides the security capabilities, such as identity and credential management. Galley is responsible for validating, ingesting, aggregating, transforming, and distributing config within Istio.
Installing Istio on your cluster
First, you need to download the latest version of Istio. You can find the latest release on the Istio releases page. Download and extract the Istio release package using curl, and set the istioctl command-line utility in your PATH with the following commands:
> curl -L https://istio.io/downloadIstio | sh -
> cd istio-*
> export PATH=$PWD/bin:$PATH
Deploy Istio on your cluster
Now that it’s installed, you can use istioctl to deploy Istio on your Kubernetes cluster. The following command installs the default version of Istio, which is suitable for most use cases:
istioctl install --set profile=default -yThis command installs Istio’s control plane components in the istio-system namespace and configures the necessary CRDs and permissions.
Enable automatic sidecar injection
Istio’s automatic sidecar injection allows your Kubernetes deployment to automatically inject Envoy containers into your application pods. To enable automatic sidecar injection for a specific namespace, you must label that namespace with istio-injection=enabled:
kubectl label namespace default istio-injection=enabledThis command labels your namespace, instructing Istio to automatically inject Envoy sidecar proxies into pods deployed in this namespace.
Check Istio’s control plane components:
kubectl get pods -n istio-systemYou should see Istio’s control plane components running in the istio-system namespace.
Verify that the namespace is labeled for automatic sidecar injection:
kubectl get namespace -L istio-injectionEnsure that your namespace is listed and has istio-injection=enabled.
With Istio installed, you’re now ready to implement canary releases.
Deploy your application
Start by deploying the initial version (v1) of your application. Create a Kubernetes deployment and a service that routes traffic to your application. Two versions of a Python application are deployed on Docker Hub, so we’ll use that throughout this tutorial.
apiVersion: v1
kind: Service
metadata:
  name: myapp
spec:
  ports:
  - port: 8000
    name: http
  selector:
    app: myapp
---
apiVersion: v1
kind: ServiceAccount
metadata:
  name: myapp-account
  labels:
    account: myapp
---
apiVersion: apps/v1
kind: Deployment
metadata:
  name: myapp-v1
spec:
  replicas: 1
  selector:
    matchLabels:
      app: myapp
      version: v1
  template:
    metadata:
      labels:
        app: myapp
        version: v1
    spec:
      serviceAccountName: myapp-account
      containers:
      - name: myapp
        image: docker.io/khabdrick/quotes:v1
        resources:
          requests:
            cpu: "100m"  # Requests 100 milliCPUs
            memory: "256Mi"
          limits:
            cpu: "200m"  # Limits the CPU usage to 200 milliCPUs
            memory: "512Mi"
        ports:
        - containerPort: 8000
---
Configure Istio routing
In this section, we’ll use three main Istio resources: Gateway, DestinationRule, and VirtualService. These resources expose the app and control the traffic routing based on specified rules and criteria.
Create a file with the name istio.yaml and paste the following as represented here for each kind.
Gateway
A Gateway exposes the application so that it can be accessed in the browser.
apiVersion: networking.istio.io/v1alpha3
kind: Gateway
metadata:
  name: myapp-gateway
spec:
  selector:
    istio: ingressgateway # use istio default controller
  servers:
  - port:
      number: 8080
      name: http
      protocol: HTTP
    hosts:
    - "*"
VirtualService
A VirtualService in Istio configures how requests are routed to various service versions. It defines a set of traffic routing rules to apply when a host is addressed. Each routing rule defines matching criteria for the traffic of a specific protocol.
Here’s the VirtualService configuration:
apiVersion: networking.istio.io/v1alpha3
kind: VirtualService
metadata:
  name: myapp-vs
spec:
  hosts:
  - "*"
  gateways:
  - myapp-gateway
  http:
  - match:
    - uri:
        exact: /themes/
    - uri:
        prefix: /quote/
    - uri:
        exact: /home/
    route:
    - destination:
        host: myapp # must match the Service we created earlier
        subset: v1
        port:
          number: 8000
      weight: 90  # Decrease as v2 proves stable
    - destination:
        host: myapp # must match the Service we created earlier
        subset: v2
        port:
          number: 8000
      weight: 10  # Increase as v2 proves stable
This configuration routes 90% of the traffic to version 1 (v1) and 10% to version 2 (v2).
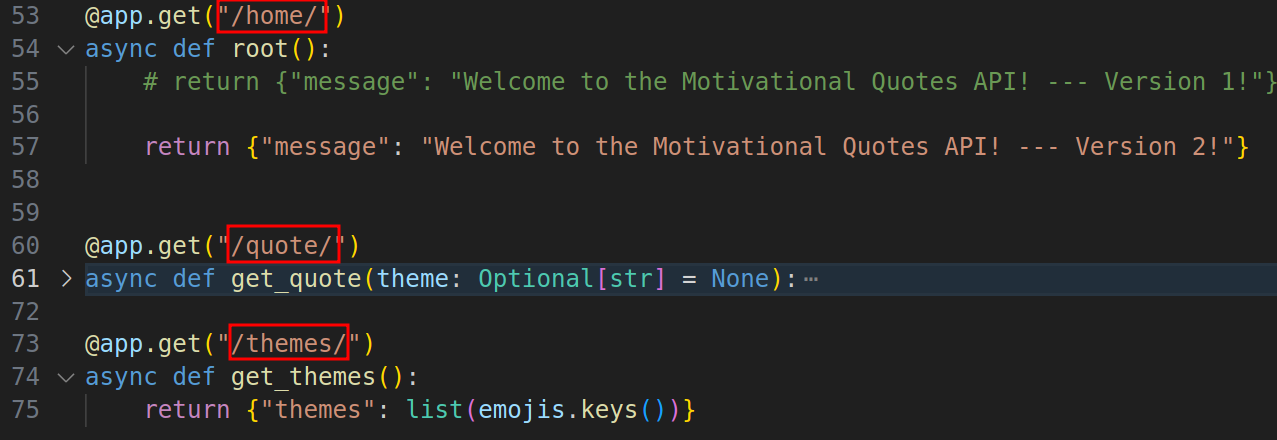
match.uri is used to list the routes to match what we have in the application.
DestinationRule
A DestinationRule in Istio defines policies that apply to traffic intended for a service after routing has occurred. Version-specific policies are specified by defining a named subset and overriding the settings specified at the service level. Here, we define subsets corresponding to different versions of the service. This allows Istio to distinguish between different sets of pods (versions of your application).
Here’s the DestinationRule configuration:
apiVersion: networking.istio.io/v1alpha3
kind: DestinationRule
metadata:
  name: myapp-destination
spec:
  host: myapp
  subsets:
  - name: v1
    labels:
      version: v1
  - name: v2
    labels:
      version: v2
Apply the manifest file:
kubectl apply -f istio.yamlDeploy the new version of your application
Deploying the second version (v2) of your application is similar to deploying the first version, but with the version label and container image tag updated to v2. You don’t have to worry about the service because v2 will still utilize the already created service:
apiVersion: apps/v1
kind: Deployment

metadata:
  name: myapp-v2

spec:
  replicas: 1
  selector:
    matchLabels:
      app: myapp
      version: v2
  template:
    metadata:
      labels:
        app: myapp
        version: v2
    spec:
      containers:
      - name: myapp
        image: docker.io/khabdrick/quotes:v2
        resources:
          requests:
            cpu: "100m"  # Requests 100 milliCPUs
            memory: "256Mi"
          limits:
            cpu: "200m"  # Limits the CPU usage to 200 milliCPUs
            memory: "512Mi"
Apply this configuration.
Now you can access your application by running:
minikube tunnelYou will now be able to access your application at http://localhost/home/. If you refresh the page rapidly, you will notice that v1 shows up more than v2.
Add autoscaling to deployment
To test how much of the traffic reaches each version, we’ll use Kubernetes autoscaler. This will handle the replica ratios, creating or deleting pods when necessary. This helps ensure that your application can handle variable loads without manual intervention, maintaining performance while avoiding over-provisioning resources.
Metrics Server is responsible for aggregating resource usage data in Kubernetes and needs to be installed for the autoscaling to work properly.
If Metrics Server is not installed, you can install it using kubectl:
kubectl apply -f https://github.com/kubernetes-sigs/metrics-server/releases/latest/download/components.yamlAfter installation, verify that Metrics Server is running:
kubectl get deployment metrics-server -n kube-system
kubectl get pods -n kube-system | grep metrics-server
Now run the kubectl autoscale commands:
kubectl autoscale deployment myapp-v1 --cpu-percent=50 --min=1 --max=6
kubectl autoscale deployment myapp-v2 --cpu-percent=50 --min=1 --max=6
The commands above tell Kubernetes to manage the scaling of the myapp-v1 and myapp-v1 deployments automatically, adjusting the number of pods between 1 and 6 to achieve an average CPU utilization of 50% for each deployment.
To test, we’ll need to create conditions that increase the CPU usage of the pods in your deployment. This can be done in several ways, depending on the nature of your application. For this example, we’ll use a Python script to simulate some load on the application.
After implementing the load, the number of pods has increased.
kubectl get pods | grep myappYou may notice that only one pod is running v2 of the application, and v1 maxes out to six pods. This verifies that our 90:10 weight works.
Monitor and Adjust Traffic Split
Monitoring is a significant aspect of canary releases, as it provides insights into the performance and health of the new version of the application under real-world conditions.
To monitor the application’s performance,we’ll use Istio’s built-in telemetry features: Prometheus for monitoring and Grafana for visualization. Monitoring these metrics allows you to understand the impact of new versions on your system’s performance and user experience.
If version 2 of your application demonstrates stable performance and positive feedback, you should gradually shift the traffic weights in the VirtualService to favor version 2. This can be done incrementally — for example, incrementally shifting 20% more traffic to version 2 and monitoring the outcomes. You can use a tool to automate this process, but in this tutorial we’ll do it manually.
Install Prometheus and Grafana
Istio has add-on manifests to deploy these tools. You can apply them to your cluster by running the following command:
kubectl apply -f https://raw.githubusercontent.com/istio/istio/release-1.11/samples/addons/prometheus.yaml

kubectl apply -f https://raw.githubusercontent.com/istio/istio/release-1.11/samples/addons/grafana.yaml
Access Grafana
Once Grafana is installed, you can access it through the Kubernetes API:
kubectl -n istio-system port-forward svc/grafana 3000:3000Now you can simulate some load by running the Python script.
Access Grafana by navigating to http://localhost:3000, and then navigate to the mesh dashboard, and you can confirm the success rate or any metric you are interested in. If everything is going well, you can go ahead and increase the load percentage going to v2.
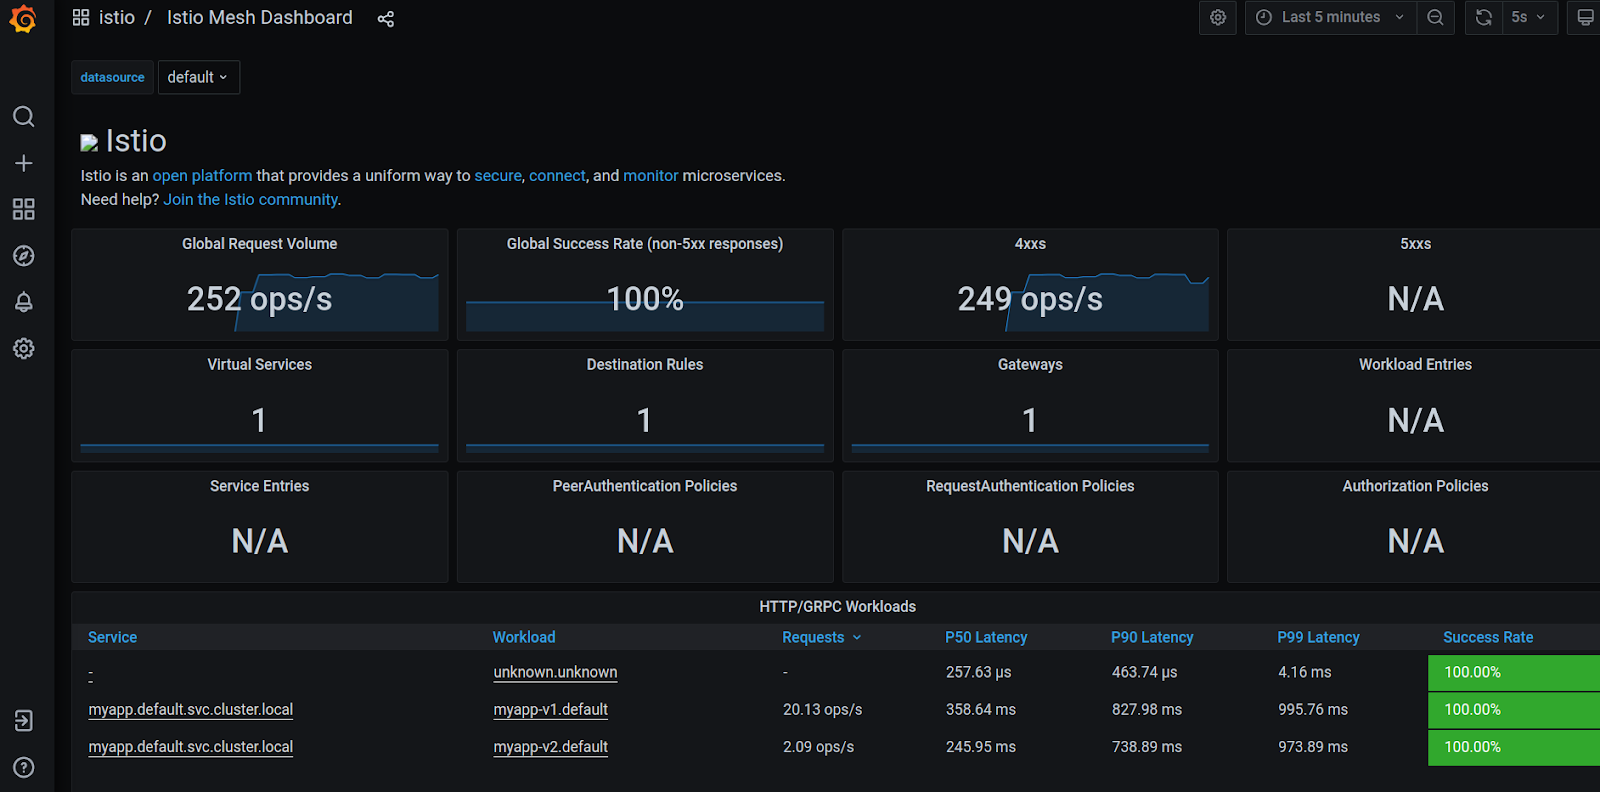
You could also take a look at the Istio Service Dashboard by navigating to the left-hand corner of Grafana dashboard’s navigation menu or by visiting http://localhost:3000/d/LJ_uJAvmk/istio-service-dashboard in your web browser.
These metrics will help you make informed decisions about traffic routing.
If the new version is performing well, you might want to increase its traffic share by updating the VirtualService weights to gradually shift more traffic to the new version and applying your changes
spec:
  ...
    route:
    - destination:
        host: myapp
        subset: v1
        port:
          number: 8000
      weight: 70  # Adjusted from 90 to 70
    - destination:
        host: myapp
        subset: v2
        port:
          number: 8000
      weight: 30   # Adjusted from 10 to 30
Continue adjusting these weights until version 2 is handling 100% of the traffic. Be cautious and proceed in a manner that minimizes risk, based on your observations and metrics.
Conclusion
Implementing canary releases with Istio and Kubernetes allows you to minimize the risk of introducing new software versions in production. By carefully adjusting traffic between different versions based on real-world performance and feedback, you can ensure a smooth experience for your users. This approach not only improves reliability, but also allows for more aggressive innovation cycles.
You can access the code used in this tutorial on GitHub.